MacOS Reference Application
Basic Overview
The MacOS Meeting SDK Reference Application shows how you would use the Visionable MeetingSDK to build an application for MacOS to join a meeting, process incoming audio and video data/metadata as well as capture and send audio and video into the meeting for others to see and hear.
The Reference Application does demonstrate best practices when using the MeetingSDK but it does not necessarily reflect best practices in MacOS UI design and implementation. Instead, it gives you an "idea" on how you can pair MacOS UI design with the SDK.
We'll take a walk through the MacOS Meeting SDK Reference app and show you how it uses the SDK to implement participation in a meeting. To launch the application, simply double-click on the application icon. You will be greeted with the following screen:
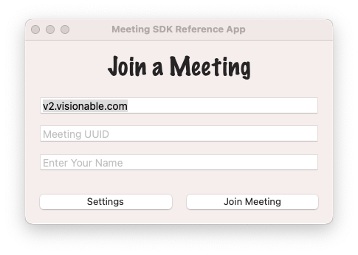
Join a Meeting Screen (358x255 pixels) Here you will see a place to enter a Meeting UUID as well as the name you'd like to join as. When using the reference app, you can only join as a "guest" (there is no notion of "logging in" to a remote server).
Before filling in the Meeting UUID and your name, click on the "Settings Button" to set your audio and video settings. No data is saved between invocations of the application, so you will need to repeat this step every time you run the application.
Retrieving Audio and Video Options
The Settings screen (shown below) will give you a list of all audio and desktop sharing "devices" you select to send up into the meeting:
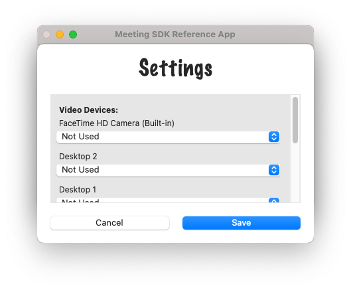
Settings Screen (351x292 pixels) If you scroll down to the bottom of the list, you will see audio input/output options. Use the pop-up menus to select which devices you'd like to enable for the meeting. Below, you will see I've chosen my Bluetooth headset for both input and output.
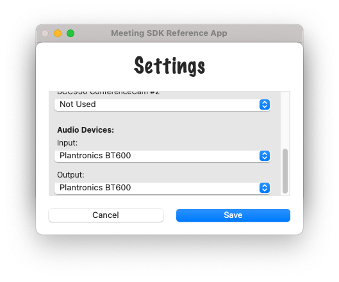
Settings Screen 2 (339x282 pixels) Obtaining the list of available audio and video devices is done with the getVideoDevices, getAudioInputDevices and getAudioOutputDevices calls:
Apple - Retrieve Audio and Video Options
Metadata:
- Emoji:
- Background Color: #018FF4
- Slug: apple-retrieve-audio-and-video-options
- ID: 60a256e2106d5d00595a153e
- Link: https://visionable.readme.io/v1.0/recipes/apple-retrieve-audio-and-video-options
NoteIf you look at the entries in the audio popup menus, you will likely see an entry that starts with “default” that is otherwise a duplicate of one of the other entries. The “default” entry is the “recommended” on, it is likely what the default audio input/output device is for the Mac you are using. You may choose to just show the word "default" for this entry in your user interface as opposed to displaying the entire string returned by the API.
Choose at least one video or desktop sharing option. The pop-up menus will tell you what resolution to "send up" to the meeting. Then click "Save" to return to the "Join Meeting" screen.
For each available video device, you can retrieve the available resolutions with the getSupportedVideoSendResolutions API call:
Apple - Get Supported Video Resolutions
Metadata:
- Emoji:
- Background Color: #018FF4
- Slug: apple-get-supported-video-resolutions
- ID: 60a2620f7995ce00517cec9c
- Link: https://visionable.readme.io/v1.0/recipes/apple-get-supported-video-resolutions
It is expected that you will provide the user with a list of available resolutions for each device available. The SDK supports allowing the user to select multiple video input devices and resolutions to be sent up into the meeting. We will cover how to enable outgoing video below.
Initializing and Joining a Meeting
Find a valid Meeting UUID to use for this meeting. Once you have it, enter it into the proper location in the "Join Meeting" window and enter a name to use when joining the meeting, like this:
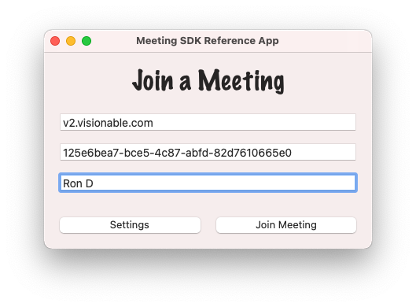
Join a Meeting - Filled In Screen (416x307 pixels) Then, click "Join Meeting" to join the meeting!
Joining a meeting involves a two step process of calling the initializeMeeting and joinMeeting API calls. These must be "chained" as you cannot join a meeting until the initialization process completes. This can be achieved with the following code:
Apple - Initialize and Join a Meeting
Metadata:
- Emoji:
- Background Color: #018FF4
- Slug: apple-initialize-and-join-a-meeting
- ID: 60a25ecc710b11004e52167f
- Link: https://visionable.readme.io/v1.0/recipes/apple-initialize-and-join-a-meeting
Enabling Local Audio and Video
Part of the "Join Meeting" process should be to automatically enable outgoing video as well as incoming/outgoing audio for your device (once you have successfully joined the meeting). You can do this with the following code:
Apple - Enable Audio/Video for Meeting
Metadata:
- Emoji:
- Background Color: #018FF4
- Slug: apple-enable-audiovideo-for-meeting
- ID: 60a267d52abdf9002387ce0d
- Link: https://visionable.readme.io/v1.0/recipes/apple-enable-audiovideo-for-meeting
Setting the Delegate
Once a meeting is successfully joined, the SDK will attempt to notify you of any "meeting events" through an instance of the MeetingSDKDelegate. This delegate class should be implemented by one of the classes in your application, and an instance of that class needs to be assigned to the delegate property in the MeetingSDK singleton. This usually happens just before you start the "join meeting" process. First, you need to have a class that implements the delegate protocol. In the MacOS Reference Application, that is the MeetingViewController class:
class MeetingViewController: NSViewController, MeetingSDKDelegate, NSTableViewDelegate, NSTableViewDataSource {
    // Rest of implementation here
    ...
}
Then, you need to make sure you set the delegate in the MeetingSDK singleton. In the case of our MeetingViewController class, this happens right before we call joinMeeting in the viewDidLoad() method:
override func viewDidLoad() {
    super.viewDidLoad()
    // Do view setup here.

    // Set delegate
    MeetingSDK.shared.delegate = self
}
Once the delegate is set, you will begin to see delegate methods being called when meeting events occur. Such events include, but are not limited to, participants joining the meeting, video streams being added and removed from the meeting, and participants leaving the meeting. We'll cover how to respond to such events in the "Responding to Meeting Events" section below.
Enabling/Disabling Local Audio and Video, Exiting the Meeting
Once the user has joined a meeting, it is common for your user interface to provide controls to allow the user to mute/unmute their audio, disable/enable their outgoing video and to exit the meeting. The reference app does this in the "Meeting" screen with three buttons at the bottom of the window:

Meeting Window with Controls (512x398 pixels) The "Mute Me" and "Video Off" buttons are "Toggle" buttons that, when clicked, will be renamed to "Unmute Me" and "Video On". This also triggers the muting/unmuting of local audio and the enabling/disabling of local video. This is implemented through the SDK as follows:
Mute/Unmute Local Audio
To mute or unmute video, use either the disableAudioInput API call (to mute) or the enableAudioInput API call (to unmute). You must pass the name of the audio device as returned by the getAudioInputDevices call.
Apple - Mute/Unmute Local Audio
Metadata:
- Emoji:
- Background Color: #018FF4
- Slug: apple-muteunmute-local-audio
- ID: 60d3515549c0e9005aa9ef19
- Link: https://visionable.readme.io/v1.0/recipes/apple-muteunmute-local-audio
Enable/Disable Local Video
To disable local video, you will use the disableVideoCapture API call on all video devices to be disabled:
Apple - Disable Local Video
Metadata:
- Emoji:
- Background Color: #018FF4
- Slug: apple-disable-local-video
- ID: 60d35d68813653001dd78a8e
- Link: https://visionable.readme.io/v1.0/recipes/apple-disable-local-video
Keep in mind that we've already covered how to enable local video in the "Enable Audio/Video for Meeting" recipe above.
Exit the Meeting
You will most likely have an "Exit Meeting" type button in your user interface. The MacOS MeetingSDK Reference app does, and uses the following code to exit the meeting when the button is clicked:
Apple - Exit Meeting
Metadata:
- Emoji:
- Background Color: #018FF4
- Slug: apple-exit-meeting
- ID: 60d35f5aa18a340062a59f71
- Link: https://visionable.readme.io/v1.0/recipes/apple-exit-meeting
Controlling Input Volume, Overall Output Volume
You will notice that at the bottom the "Meeting" window in the reference app there are two sliders. One is to control the "input level" of the audio input device (independent of what the operating system settings may be) and the other is to control the "output level" of the audio output device (again, independent of what the operating system setting may be). The reference app handles this by implementing action routines that are fired whenever the value of either slider is changed (defined in MeetingViewController.swift):
@IBAction func doAudioInputSlider(_ sender: NSSlider) {
    let newInputLevel = sender.integerValue
    MeetingSDK.shared.setAudioInputVolume(Int32(newInputLevel))
}

@IBAction func doAudioOutputSlider(_ sender: NSSlider) {
    let newOutputLevel = sender.integerValue
    MeetingSDK.shared.setAudioOutputVolume(Int32(newOutputLevel))
}
The API calls setAudioInputVolume() and setAudioOutputVolume() both take a single Int32 integer argument between 0 and 100 that sets the input and output volumes respectively. It should be noted that these API calls only work for MacOS. If you are also implementing an iOS application, these API calls are defined but do not affect any changes (see the iOS documentation for more details)
Responding to Meeting Events
The MacOS SDK Reference app uses a window containing a table view to show all participants in the active meeting. You can see an example of this window above in the "Enabling/Disabling Local Audio and Video, Exiting the Meeting" section. While the meeting is active, all "meeting events" are reflected through this main window and any video windows that appear for the participants in the meeting. The reference app responds to meeting events by using an instance of the pMeetingSDKDelegate.
We'll take a look at how the MacOS SDK Reference App implements various delegate methods. We can inspect the implementation of each delegate method and will provide further recipes for any implementation that involves making additional SDK calls!
participantAdded
We receive a participantAdded delegate method call when we see a new participant for the first time. At the low level of the SDK, we might have been notified of an audio or video stream for this user (they will always have an audio stream, but if they are joining with audio and video we might be notified of the video stream first). The reference app uses this code:
func participantAdded(participant: Participant) {
        if let audioInfo = participant.audioInfo {
            // Add default audio level for this stream into array in MeetingState
            MeetingState.shared.audioStreamVolumes[audioInfo.streamId] = 50
        }

        DispatchQueue.main.async {
            self.participantArray = MeetingSDK.shared.participants
            self.participantTableView.reloadData()
        }
    }
The reference app makes use of a singleton class (MeetingState) to hold information about the meeting. This is not part of the SDK, but rather a design choice made when implementing the reference app. You may wish to do something similar in your app. One of the things we store in this singleton is a dictionary of volume levels for all audio streams. We key it off of the audio stream id (a string) and set it to a default initial value of 50. Next, we make a copy of the current list of Participant objects (a Participant represents a unique user in the meeting) and store it locally. We'll use the local copy to populate our table view. We always have to update the copy before doing this as the SDK is constantly updating that array based on low level events coming directly from the meeting server. The participantTableView property stores the actual table view object in the window, so we'll call reloadData() on that object, making sure to do that on the main (UI) thread.
participantVideoAdded
The participantVideoAdded delegate method will be called for each video stream added to the meeting by each Participant. Remember that a participant may have multiple video streams associated with them. The action to take when this method is called is to ask the SDK to enable the video stream. That will cause the SDK to create an NSView object in which the video will be rendered. The reference app uses this code:
func participantVideoAdded(participant: Participant, streamId: String) {
    MeetingSDK.shared.enableVideoStream(participant: participant, streamId: streamId)
}
The two parameters you need to pass to enableVideoStream() are provided as the arguments to the delegate method:
Apple - Enable Video Stream
Metadata:
- Emoji:
- Background Color: #018FF4
- Slug: apple-enable-video-stream
- ID: 60d37e02942e69002a551bb1
- Link: https://visionable.readme.io/v1.0/recipes/apple-enable-video-stream
participantVideoUpdated
The participantVideoUpdated method is called when any of the "metadata" associated with a given video stream is updated for a video stream that we've already received a participantVideoAdded delegate method callback for. Consult the documentation for the VideoInfo structure (in the SDK Reference) to see what fields could have been changed. The reference app (being a simple application) does not take any action in this method. This is because it may have already responded to events that caused some of the values in the VideoInfo structure to change and/or it doesn't need to respond to them. Here are some of the scenarios where you might care about these values changing:
- The 'site' field might change if the user changes the name they are sending for themselves in the middle of the meeting. You could conceivably update any name you are displaying for the user by utilizing the 'displayName' property of the 'Participant' object when this callback occurs.
- The 'deviceName' field could conceivably change but it is not likely. This would be the name of the remote user's camera device OR the name of a window/desktop they are sharing into the meeting.
- The 'active' field may change to "false" if the local display of a video stream in the meeting is disabled. However you would already know that is happening as you would have to make a disableVideoStream SDK call to trigger this (covered later)
- The 'codec_name' field can change if a meeting participant decides to change the resolution of their camera. This won't necessarily require you to take any action unless you would like to attempt to resize the VideoView being used to render the corresponding window (otherwise the SDK will still render the video in the VideoView as it is currently sized)
- The 'layout' string may change. This is a value (usually an integer) that can be used by some clients to dictate how to display/tile windows. The SDK does not (currently) provide a way to set this value, so it is of limited use.
- The 'width' and 'height' values of the source video may change, but any immediate changes needed in the rendering and handled for you and if you notice these change it is purely for information purposes only. You should not need to take any action.
participantVideoViewCreated
Called when you have enabled a new video stream and the SDK is ready to hand you a new VideoView object to add to your user interface. The VideoView object is derived from NSView and can be added with a standard addSubview NSView Framework call. The reference app handles it this way:
func participantVideoViewCreated(participant: Participant, videoView: VideoView, local: Bool) {
    // Since the reference app wants to store the streamId with the window it will create,
    // we need to iterate through all the VideoInfo objects for this participant and find
    // the one corresponding to the VideoView just created.  Then we can pass the right streamId
    for videoInfo in participant.videoInfo {
        if videoInfo.videoView == videoView {
            spawnWindow(videoInfo.videoView!, streamId: videoInfo.streamId)
        }
    }
}
The 'spawnWindow' function is defined in the reference app's MeetingViewController.swift file. It instantiates a new view controller from the Storyboard that is designed to display the VideoView handed to us from the SDK. It will call addSubview and then create a new NSWindow with the instantiated view controller.
participantVideoViewRetrieved
Called as a result of calling the enableVideoStream() SDK call for a video stream that a VideoView had already been created for once. This is a rare occurrence, but can happen if you were to call disableVideoStream for a given stream id directory followed by calling enableVideoStream with the same stream id later. This serves as an indicator to you that the VideoView passed to the delegate method is about to become active again, and you may need to take measures in your user interface to allow that. The reference app will hide a video window if its stream is disabled, so when it gets this delegate method call it will search for the window and make it visible again:
func participantVideoViewRetrieved(participant: Participant, videoView: VideoView) {
    // If this window was put in the background/hidden because the stream was disabled,
    // we need to bring it back to the foreground
    if let streamId = participant.videoInfo.first?.streamId {
        for videoStreamVC in MeetingState.shared.videoWindows {
            if videoStreamVC.streamId == streamId {
                videoStreamVC.window?.orderFront(self)
            }
        }
    }
}
participantVideoRemoteLayoutChanged
As mentioned as part of the 'participantVideoUpdated' callback documentation, there is a field in the VideoInfo structure named 'layout' which can be used to give hints to a meeting application on how to lay out video views in the client application. This method is triggered if the value associated with the 'layout' field is changed. The reference app does not attempt to do anything with this field so, in the reference app, this delegate method implementation takes no action.
participantVideoRemoved
Called when a video stream is removed from the meeting. Your user interface should remove any UI elements associated with this video stream. The reference app handles it this way:
func participantVideoRemoved(participant: Participant, streamId: String, videoView: VideoView?) {
    for videoInfo in participant.videoInfo {
        if videoInfo.streamId == streamId {
            self.removeWindow(videoInfo.streamId)
        }
    }
}
'removeWindow' is a method implemented in the reference app's MeetingViewController.swift file. It takes the actions required to remove the window from the user interface.
participantRemoved
This delegate method is called when the participant passed as the first argument has exited the meeting. The implementation of this delegate method will clean up all model data stored in the user interface as well as removing any video windows associated with this participant. It will also update the list of participants shown in the table view by calling reloadData() on the main thread.
func participantRemoved(participant: Participant) {
    DispatchQueue.main.async {
        self.participantArray = MeetingSDK.shared.participants
        self.participantTableView.reloadData()
    }

    // Remove all video windows
    for videoInfo in participant.videoInfo {
        self.removeWindow(videoInfo.streamId)
    }
}
participantDidMute
Called when a remote participant mutes their audio. The reference app does not implement this method but it could be used to provide a visual indicator that this particular participant's audio is muted
participantDidUnmute
Called when a remote participant unmutes their audio. The reference app does not implement this method but it could be used to provide a visual indicator that this particular participant's audio is no longer muted
inputMeetingChanged
Called whenever the sdk detects that the audio input of the local user has changed. If the local user is speaking, there will be many of these calls! The reference app does not implement this method but it could be used to provide a visual indicator of the audio input level resulting from the local user speaking. While the argument is a string, the value can be interpreted as an integer value.
outputMeterChanged
Called whenever the sdk detects that the audio level coming from the meeting has changed. This will be called frequently as people in the meeting talk! The reference app does not implement this method but it could be used to provide a visual indicator of the audio output level coming from the remote users. While the argument is a string, the value can be interpreted as an integer value.
amplitude
Called whenever the sdk detects that the audio level coming from an individual user in the meeting has changed. This will be called frequently as people in the meeting talk! The reference app does not implement this method but it could be used to provide a visual indicator of the audio output level of a particular user in the meeting. While the argument is a string, the value can be interpreted as an integer value.
Miscellaneous Tasks
As a reminder, the reference app creates a main window to display a table view with all the participants who are currently in the meeting:
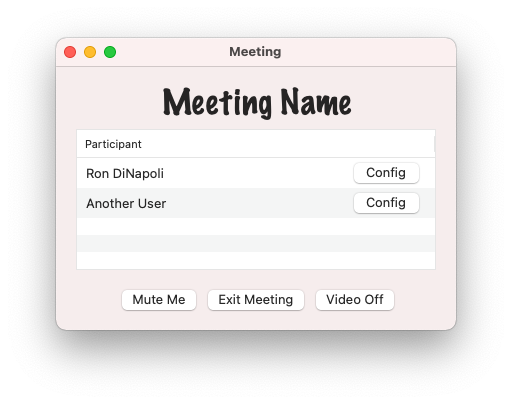
Meeting Window with Participants (512x404 pixels) You will notice that there is a "Config" button that shows for every participant in the meeting. If the participant is the local participant, the reference app will show a window that lets the local user change video sources and the resolution used when transmitting video into the meeting. This uses SDK API calls already covered here.
If the participant is a remote participant, clicking on "Config" will show a window similar to this:
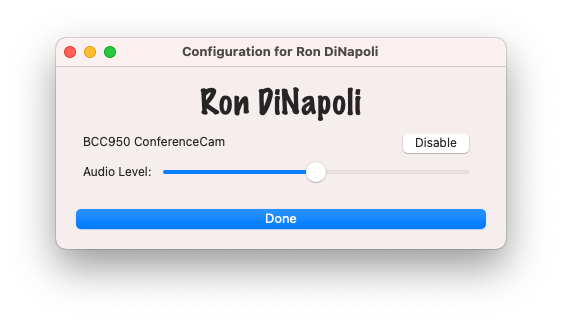
Configuration Window for Remote Participant (562x323 pixels) The configuration window for a remote participant will show every video source associated with that participant as well as their individual audio level. This window can be used to enable/disable a video stream as well as change the audio level of an individual remote participant.
Enabling/Disabling Video
Earlier, we discussed how to enable/disable local video. In that context, we were talking about how to turn local video sources on/off and send/stop sending the video captured up into the meeting. In this context, enabling/disabling video refers to whether or not we want the SDK to actively render video streams associated with a given video stream id. It has nothing to do with whether or not the video is present in the meeting, just whether or not the local client will render it. We can chose to enable/disable both remote/local video sources -- we just need to know the stream id.
Notice that the Configuration window pictured above contains a button (titled "Disable") for each video source associated with the participant shown. If you click on the "Disable" button you will tell the reference app to take the steps necessary to stop displaying (locally) the video associated with that video source. Once disabled, the reference app will change that button to read "Enable" so that another click on it will re-enable the video. The code to handle this is an action routine implemented as such:
@objc func enablePushed(_ sender: NSButton) {
    let streamId = String(sender.tag)

    if sender.title == "Disable" {
        sender.title = "Enable"
        MeetingSDK.shared.disableVideoStream(streamId: streamId)

        for videoStreamVC in MeetingState.shared.videoWindows {
            if videoStreamVC.streamId == streamId {
                videoStreamVC.window?.orderOut(self)
                return
            }
        }
    } else {
        sender.title = "Disable"
        MeetingSDK.shared.enableVideoStream(participant: self.participant!, streamId: streamId)
    }
}
As you can see, if we are going to disable the video stream, we'll set the button's title to "Enabled" and then proceed with disabling the stream. We use the disableVideoStream() SDK API call which just takes a stream id as the sole argument. The reference app sets up the button such that its "tag" field is the stream id. Once we've called disableVideoStream() we won't get any frame updates for that window, but we still need to go through all of the video windows and hide the one associated with this stream.
Finally, if we are enabling the video stream, we'll set the button title back to "Disable" right away and call the enableVideoStream() method in the SDK. In this case we need the Participant associated with the stream id, but when the Configuration Window is created (look in ConfigurationViewController.swift in the reference app code), we store a copy of the Participant as an instance variable in the class. Recall that when enableVideoStream() is called in this scenario (after we've disabled the video stream once), it will cause a participantVideoViewRetrieved() delegate method to be called which will un-hide the window (see delegate method implementation details above)
Changing the Audio Level of a Remote Participant
Changing the audio level for a particular remote participant is handled with the setAudioStreamVolume() SDK API call. It takes a Int32 value between 0 - 100. The reference app implements a slider control in the Configuration window that is set to have a min value of 0 and a max of 100. Then all that needs to happen is to implement an action routine that responds when the slider value changes:
@objc func doAudioSlider(_ sender: NSSlider) {
    if let streamId = self.participant?.audioInfo?.streamId {
        let newAudioValue = sender.integerValue
        MeetingState.shared.audioStreamVolumes[streamId] = newAudioValue

        // Set level through SDK
        MeetingSDK.shared.setAudioStreamVolume(streamId: streamId, volume: Int32(newAudioValue))
    }
}
We retrieve the audio stream id from the Participant object that is stored as an instance variable in the ConfigurationViewController class. We then get the integer representation of the slider value and use it to call setAudioStreamVolume() in the SDK.
Summary
This has been a general overview of the MacOS SDK Reference application and how it interacts with the Visionable Meeting SDK (high level).
Updated 8 months ago