iOS Screen Sharing
Basic Overview
When building a Meeting SDK based application for iOS, it is possible to enable your application to share the iOS device's screen regardless of whether or not the application is in the foreground. Doing this requires the following:
- You must designate you app as being allowed to run in the background
- You must implement a standard iOS Screen Broadcast extension in your application
You can use the following additions to your application's Info.plist file to allow for background execution:

Technically, if you aren't using Airplay anywhere in your application you should just rely on the second entry.
In order to "broadcast the device's screen" into the meeting, you must implement a Broadcast Extension. This is covered in the following WWDC session:
When we have a broadcast extension embedded in a MeetingSDK based application, it can be depicted in the following way:

When you wish to begin a screen sharing session, your application will enable the screen share in much the same was as it enables the camera as a video input source. However in the case of screen sharing, this will trigger an iOS provided alert view asking the user if they'd like to start sharing their screen. If they affirm, iOS will begin sending individual video frames to the Screen Broadcast Extension. The screen broadcast extension will then transfer each video frame to the main application through a shared AppGroup. When the main application detects a new frame is present, it will send it up into the meeting for all to see. Graphically, this might look like this:
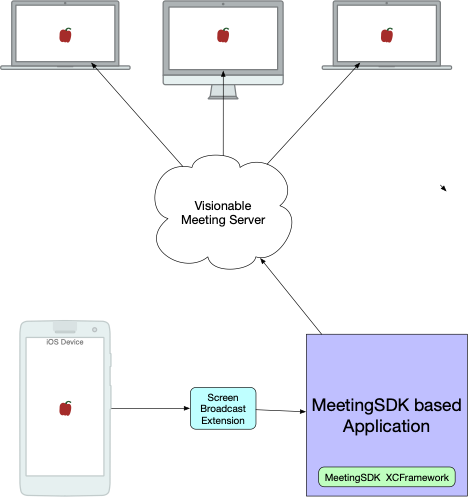
The iOS device starts capturing screen frames which in turn are sent to the Screen Broadcast Extension. The extension processes the frames and makes them available to your host application which, in turn, sends the frames up to the Visionable Meeting Server. Any other device with a user who has joined the meeting will then see the shared screen!
This requires that your main application (as well as your extension) have AppGroups enabled, and they must specify the same AppGroup to save/read data from. Also, you will need to programmatically tell the Meeting SDK (in the main application) the bundle identifier of the extension so that video frames get sent to the right one!
We'll cover all of this through the following example:
Building a MeetingSDK Enabled Application w/Screen Sharing Support
Create the New Project
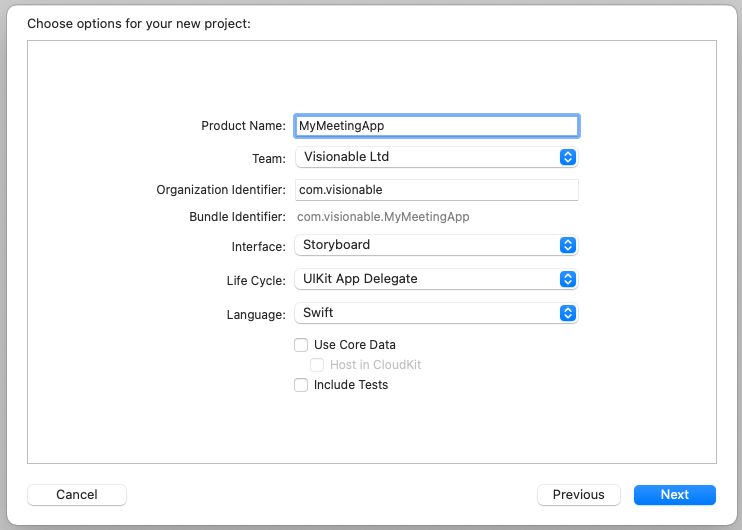
Begin by launching Xcode and creating a new iOS application using the "App" template:

Give the application a name such as "MyMeetingApp" and then click "Next":
Add MeetingSDK to the Main Application
Once the project opens, click on the "MyMeetingApp" project in the navigation area, make sure the "General" tab is selected and then drag the MeetingSDK.xcframework file to the "Frameworks, Libraries, and Embedded Content" section (making sure that the "Embed" setting is set to "Embed & Sign":

This ensures that the MeetingSDK XCFramework will be embedded into the main application and the main application will have full use of the MeetingSDK.
Create a New Broadcast Extension
The next step is to add a new target to the project for the broadcast extension. Find the small "+" icon at the bottom of the targets section and click it:

You will see the following choices. Make sure that "Broadcast Upload Extension" (NOT "Broadcast Setup UI Extension") is selected and click "Next":

Name the product "ScreenShare" or "ScreenShareExtension". Make note of the automatically generated Bundle Identifier; we'll need it later.

Add the AppGroup Capability and Configure
With the new target selected, go to the "Signing & Capabilities" tab and look for the "+ Capability" button as shown below. Click it to add a new capability.

When you click on the "+ Capability" button, a new window with a palette of capabilities is shown:

Drag the "App Groups" capability into the capability area for the ScreenShare extension:

Then, look for the small "+" button in the list of AppGroups and click on it. This will allow you to specify the name of a new AppGroup to be associated with this target:

Pick a name for the App Group and fill it in here. We'll need to remember this for future code to be written (explained below). When you've got the name you want, click OK:

The App Group you just named will likely appear in red. If you have Automatic Signing turned on, this should automatically update the provisioning profile and the application identifier on your Apple Developer Portal to associate this new app group with the application.
We'll then need to repeat this procedure for the Main application target. Select the "MyMeetingApp" target , then bring up the capabilities palette and drag the AppGroup capability in the the main applications capability area:

In all likelihood, the new app group will not be red now. Xcode should have had time to properly add it to your developer portal.
Add MeetingSDK to the Extension
Earlier we added the MeetingSDK XCFramework to the main application. Now we must add it to the extension as well. Make sure that the extension's target is selected, go to the "General" tab and then drag the MeetingSDK.xcframework file to the "Frameworks and Libraries" section:

Only this time make sure that the MeetingSDK.xcframework is NOT embedded in the application, as shown above.
Hook Up the Extension Stubs
Finally, note that there is a new "ScreenShare" folder in the project navigator. Assuming you created the extension using Swift, you should see a SampleHandler.swift file that looks like this:

As you will notice in the SampleHandler.swift file, there are five overridden functions that need implementations. Fortunately, the MeetingSDK comes with a singleton class named "MeetingSDKScreenSharing" that contains similar functions that implement what must be done when the extensions callbacks are invoked by iOS.
In order to access the MeetingSDKScreenSharing class, you must first import the SDK into your SampleHandler.swift file. Make sure the last #import statement below is added to your SampleHandler.swift file:
//
//  SampleHandler.swift
//  ScreenShare
//
//  Created by Ron DiNapoli on 7/13/21.
//

import ReplayKit
import MeetingSDK_iOS
Once done, you can now access MeetingSDKScreenSharing in your code. We'll show the modification to be made to each stubbed out callback. New begin with broadcastStarted:
override func broadcastStarted(withSetupInfo setupInfo: [String : NSObject]?) {
    // User has requested to start the broadcast. Setup info from the UI extension can be supplied but optional.
    MeetingSDKScreenSharing.sharedInstance().setAppGroupId("group.com.visionable.MyMeetingApp.screensharing")
    MeetingSDKScreenSharing.sharedInstance().broadcastStarted(withSetupInfo: setupInfo ?? [:])
}
Simply pass the arguments received by the actual stubbed out callback to the corresponding function defined in MeetingSDKScreenSharing. In addition, the broadcastStarted callback needs to identify what the AppGroup ID is that is being used to transfer data between the extension and the main application. This is the AppGroup ID that you specified when adding the AppGroup capability to both the extension and the main application.
Repeat this procedure with broadcastPaused(), broadcastResumed() and broadcastFinished():
override func broadcastPaused() {
    // User has requested to pause the broadcast. Samples will stop being delivered.
    MeetingSDKScreenSharing.sharedInstance().broadcastPaused()
}

override func broadcastResumed() {
    // User has requested to resume the broadcast. Samples delivery will resume.
    MeetingSDKScreenSharing.sharedInstance().broadcastResumed()
}

override func broadcastFinished() {
    // User has requested to finish the broadcast.
    MeetingSDKScreenSharing.sharedInstance().broadcastFinished()
}
Finally, repeat the procedure for processSampleBuffer:
override func processSampleBuffer(_ sampleBuffer: CMSampleBuffer, with sampleBufferType: RPSampleBufferType) {
    MeetingSDKScreenSharing.sharedInstance().processSampleBuffer(sampleBuffer, with: sampleBufferType)
}
Screen Sharing Setup Complete
At this point, you have taken all the steps necessary to set up the screen sharing extension. You will still need to write code in your main application to enable screen capture using the "iOS Screen" device name. Consult the section on the iOS Reference App for more information.
Telling MeetingSDK About the Extension Bundle Identifier and AppGroup ID
Just like the extension needed to tell the MeetingSDK about the AppGroup ID being used, the main application has to let the MeetingSDK know what the bundle id of the screen share extension is as well as the AppGroup ID. We do this early in the application's lifecycle; before we join a meeting.
// Since our application might need to share the screen, we have to initialize
// the iOS screen sharing parameters
MeetingAPI.sharedInstance().initializeScreenCaptureExtension("com.visionable.MyMeetingApp.ScreenShare",
						withAppGroup: "group.com.visionable.MyMeetingApp.screensharing")
Using Screen Sharing
For the purposes of demonstration, we will use the iOS Reference App.
Screen Sharing in iOS is enabled by calling the enableVideoCapture() API with "iOS Screen" and an appropriate video send resolution specifier. "iOS Screen" will always be returned as one of the valid video capture devices from the getVideoDevices() call. If passed to getSupportedVideoSendResolutions(), you will receive a number of valid send resolutions to be used when invoking screen sharing.
When the enableVideoCapture() API call succeeds, the user will be presented with an alert view from iOS asking if they'd like to share the screen:
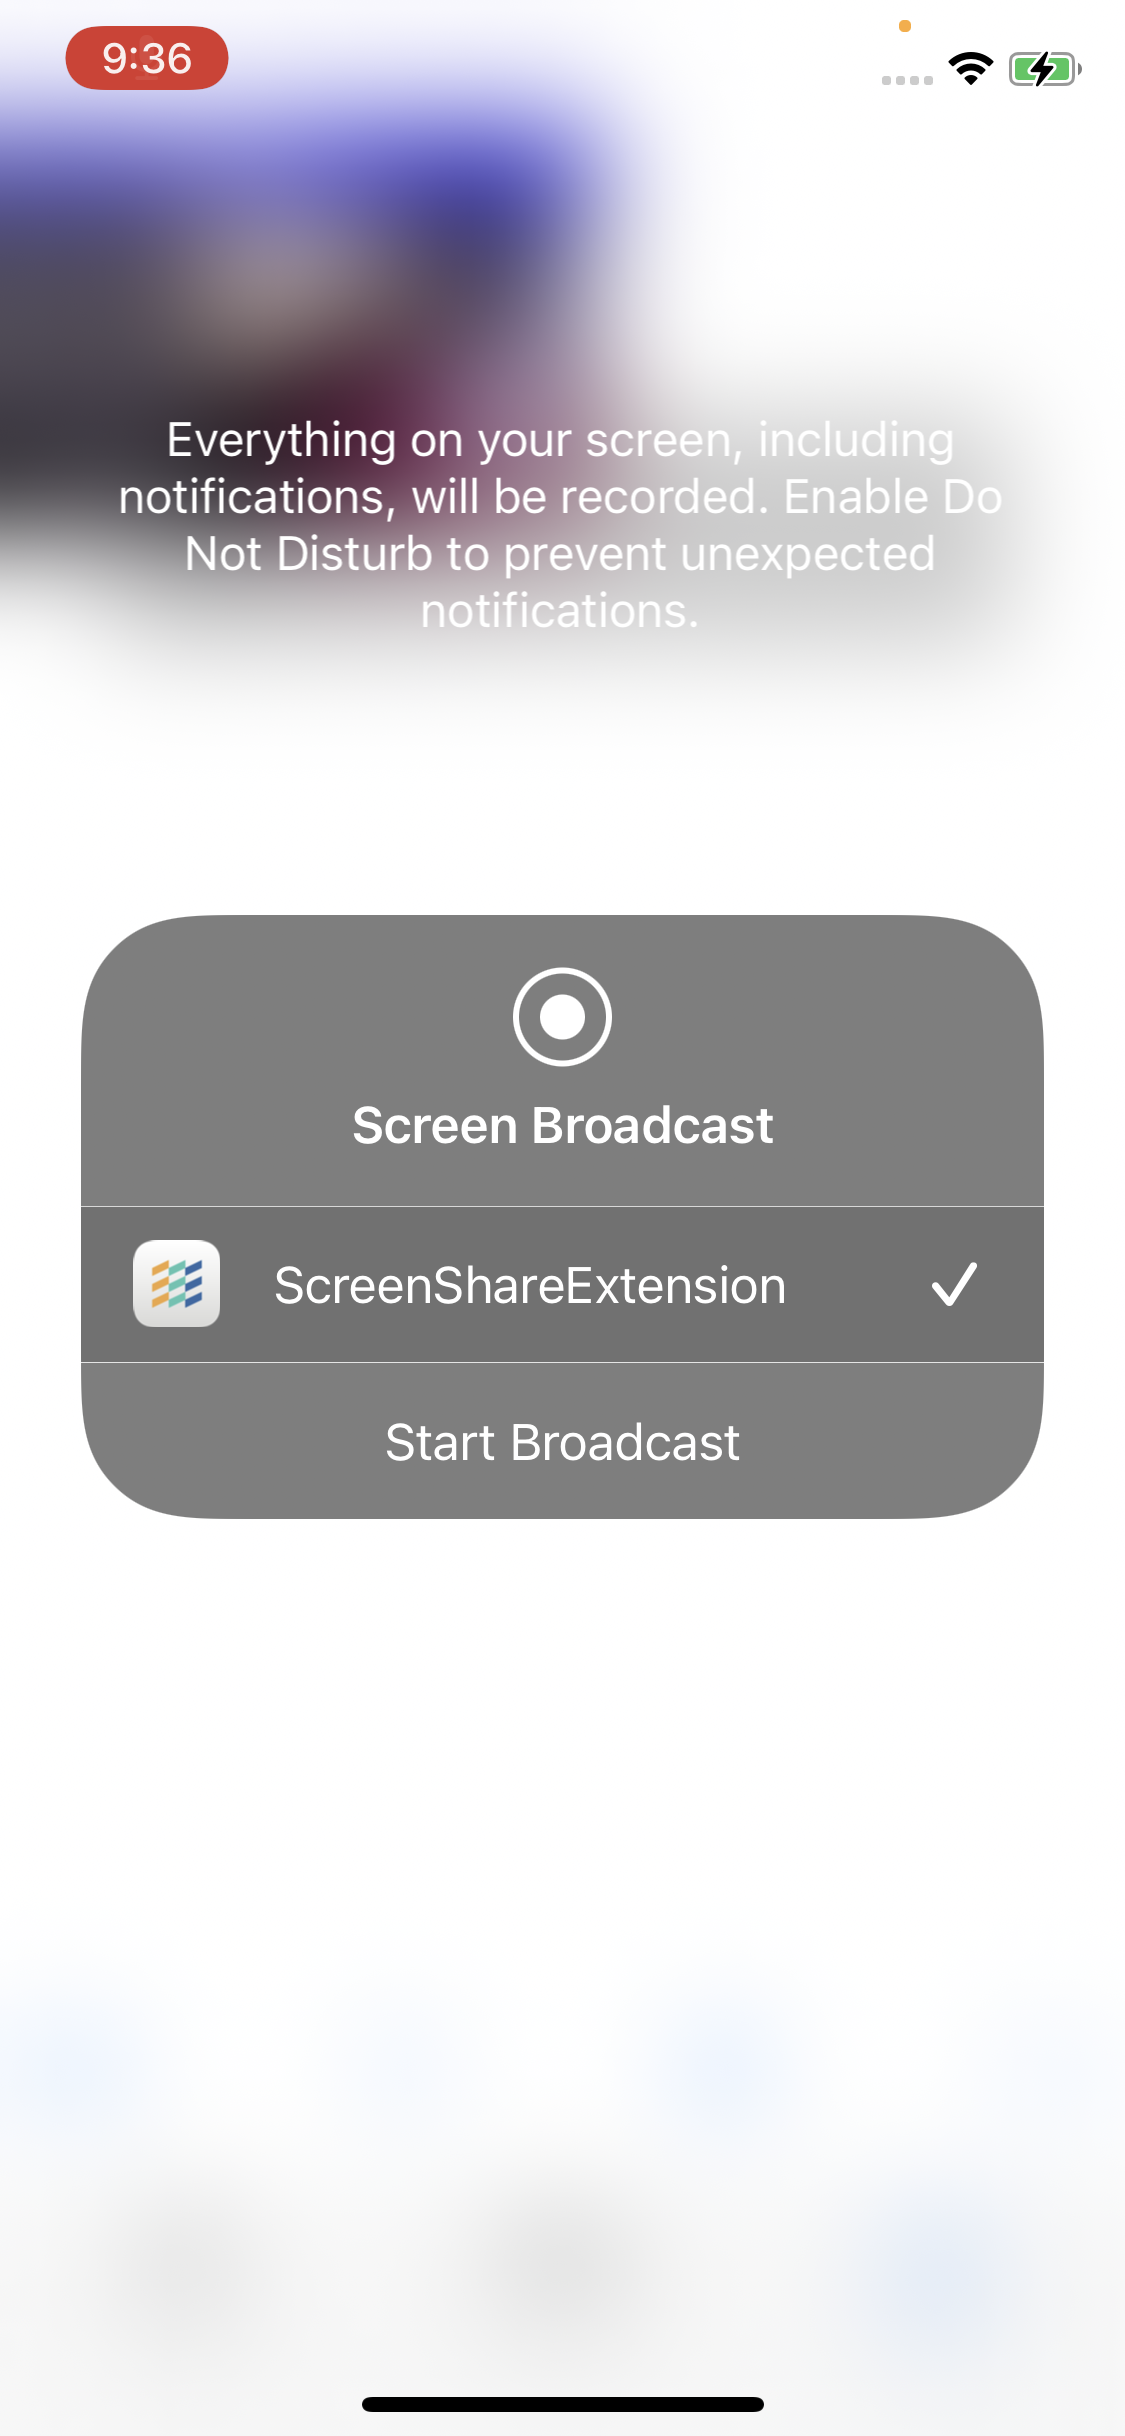
When you tap on "Start Broadcast", iOS will begin sending screen capture video frames to the extension which will use the shared AppGroup to transfer the frames to the main application (where they are then sent up into the meeting).
Summary
We implement screen sharing in iOS by utilizing Apple's ReplayKit and a screen broadcast extension. This allows us to send the contents of the screen from your MeetingSDK based application as well any other app that ends up in the foreground so long as the MeetingSDK based application is authorized for background execution.
It should be noted that if the MeetingSDK based application is placed in the background, and camera-based video capture devices will no longer send their content up in to the meeting until the application is brought back into the foreground
Updated 8 months ago